

How to Install a Smart Lock on a Metal/Steel Door (2026 Guide)
Yes — you can install a smart lock on a metal or steel door. If your door already has a standard deadbolt, a retrofit lock (August, SwitchBot, Nuki) fits in 10 minutes with no drilling; otherwise drill a 2-1/8-inch face bore and 1-inch edge bore with bi-metal hole saws.
Published 28 September 2026 · Updated 28 September 2026
AbodeAlly is reader-supported. When you buy through links on this page, we may earn an affiliate commission — it never changes our picks, and you never pay extra.
Key Takeaways
- Retrofit locks (August, SwitchBot, Nuki) need zero drilling — they clamp over your existing deadbolt in ~10 minutes.
- Drilling steel needs a 2-1/8-inch bi-metal hole saw for the face bore and a 1-inch saw for the edge bore; center-punch every mark.
- Measure backset (2-3/8″ or 2-3/4″) and door thickness (usually 1-3/4″) before buying.
- Deburr and treat bare steel edges with cold-galvanizing spray to prevent rust.
Steel doors intimidate people. They shouldn’t. A steel residential door drills cleanly with the right bit, and most of the “metal door” anxiety comes from guides that skip the actual specifics — which hole saw, which backset, what to do about rust, and whether your lock choice even requires drilling at all.
This guide gives you all of it: exact sizes, a compatibility chart for 2026 lock models, and the safety steps the thin guides leave out.
First, the decision that saves you the most work: if your steel door already has a standard deadbolt, a retrofit smart lock (August, SwitchBot, Nuki) installs in 10 minutes with a screwdriver and zero drilling — it only replaces the interior thumbturn. Only buy a full replacement lock (Schlage, Yale) if you specifically want one, or if the door has no deadbolt at all. See the retrofit vs. replacement section before you buy anything.
Tools and materials
| Tool / material | Size / spec | Why |
|---|---|---|
| Bi-metal hole saw | 2-1/8″ (54 mm) | The face bore — the big hole through the door face. Must be bi-metal (HSS teeth), not wood-only. |
| Bi-metal hole saw or step bit | 1″ (25 mm) | The edge bore — the latch hole through the door edge |
| Electric drill | Corded or 18V+ cordless | You’ll be cutting steel; a weak drill will stall |
| Center punch + hammer | — | Dimples the steel so the pilot bit doesn’t wander. Non-negotiable on metal. |
| Cutting oil | Any tapping/cutting fluid | Keeps the hole saw cool, extends tooth life, prevents work-hardening the steel |
| Painter’s tape | — | Marking + reduces paint chipping around the cut |
| Safety glasses | ANSI-rated | Metal shavings in eyes are an ER visit. Wear them. |
| Metal file (flat) | Medium cut | Deburrs sharp edges after drilling |
| Cold-galvanizing spray or zinc-rich primer | — | Anti-rust treatment for bare steel edges |
| Tape measure, pencil | — | Layout |
| Screwdriver | Phillips #2 | Lock assembly |
| Door lock installation kit (optional) | e.g. DEWALT D180004 | Includes both hole saws, mandrel, and a clamp-on drilling guide with backset bushings — worth it for one clean job |

— A bi-metal door lock installation kit (both hole saws + guide) typically runs ~$45–50 (street listings $44.99–$49.99) and pays for itself in one avoided mistake.
What you do NOT need: a drill press, an angle grinder, or any exotic tooling. A hand drill and the right hole saw do the whole job.
Key measurements: backset and door thickness
Two numbers determine everything. Measure before you buy the lock.
Backset = distance from the door’s edge to the center of the face bore. Residential standard is one of two values:
| Backset | Common in | What to buy |
|---|---|---|
| 2-3/8″ (60 mm) | Older homes, interior doors | Lock must support 2-3/8″ (most do) |
| 2-3/4″ (70 mm) | Modern exterior doors, most steel doors | Lock must support 2-3/4″ (most do) |
Nearly all 2026 smart deadbolts (Schlage, Yale, Kwikset) ship with an adjustable latch covering both backsets — but verify on the box before you leave the store.
Door thickness = the second constraint:
| Door thickness | Notes |
|---|---|
| 1-3/8″ (35 mm) | Interior doors; some older steel doors |
| 1-3/4″ (44 mm) | Standard modern exterior steel door |
Most smart locks fit 1-3/8″ to 1-3/4″ out of the box. Thicker commercial steel doors (2″+) need a thick-door kit — check the lock’s specs.
Compatibility matrix — backset × thickness:
| 1-3/8″ thick | 1-3/4″ thick | |
|---|---|---|
| 2-3/8″ backset | Standard kit fits (verify latch adjustability on the box) | Standard kit fits (verify latch adjustability on the box) |
| 2-3/4″ backset | Standard kit fits (verify latch adjustability on the box) | Standard kit fits (verify latch adjustability on the box) — most common steel-door combo |
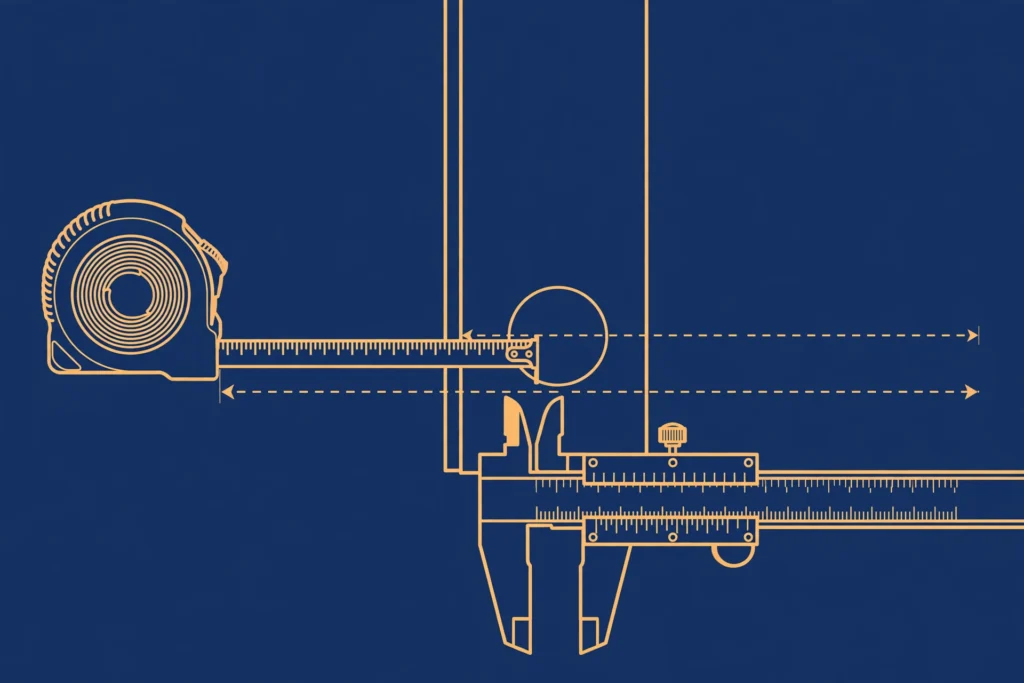
If your door falls outside this grid, stop and buy the manufacturer’s thick-door or adjustable kit — don’t improvise with a standard latch.
Retrofit vs. full replacement: which one do you need?
| Retrofit lock | Full replacement lock | |
|---|---|---|
| What it is | Replaces only the interior thumbturn; clamps over your existing deadbolt | Replaces the entire deadbolt, inside and out |
| Drilling into steel? | No. Zero new holes. | Yes — 2-1/8″ face bore + 1″ edge bore (unless door is pre-bored) |
| Exterior appearance | Unchanged | New keypad/exterior escutcheon |
| Landlord’s existing key | Still works | Replaced by new keys |
| Install time | ~10 minutes, screwdriver only | 30-60 minutes with drilling |
| Best for | Renters, existing deadbolts, anyone who hates drilling steel | New doors, no existing deadbolt, wanting a keypad outside |
Model compatibility chart (2026):
| Lock | Type | Steel-door fit | Notes |
|---|---|---|---|
| Retrofit | Excellent | Clamps over existing deadbolt; no drilling | |
| Retrofit | Excellent | Replaces interior thumbturn only; keeps existing exterior hardware | |
| Nuki Smart Lock | Retrofit | Good | Interior mount; check tailpiece compatibility with your deadbolt |
| Full replacement | Good (if pre-bored or you’re comfortable drilling) | Needs 2-1/8″ bore; verify backset adjustability | |
| Full replacement | Good (same as above) | Deadbolt version needs standard bore; check Z-Wave/Wi-Fi module options |
Reality check: most steel entry doors sold in the last 20 years arrive pre-bored for a standard deadbolt (2-1/8″ face + 1″ edge). If yours is pre-bored, a “full replacement” is a 15-minute screwdriver swap, not a drilling project. Check before you psych yourself up.
Step-by-step: drilling and installing on a steel door
Skip to step 7 if your door is pre-bored or you’re installing a retrofit lock.
Step 1 — Confirm the door is actually drillable steel
Residential steel doors are typically 24-gauge steel skins over a foam or wood core — they drill easily. If a magnet sticks firmly, it’s steel. If the door is a commercial hollow-metal door (heavy, 16-18 gauge), the same process works but go slower and use more cutting oil. If you hit concrete fill (rare, commercial fire doors), stop and call a locksmith.
Step 2 — Mark your layout
Standard deadbolt height is typically ~42″ from the bottom of the door (a common residential reference height — it varies by door; 6″ above the doorknob center is another common reference — use whichever matches your existing knob’s backset). Measure in from the door edge by your backset (2-3/8″ or 2-3/4″) and mark the face-bore center on both faces of the door. Mark the edge-bore center on the door edge at the same height.
Cover the area with painter’s tape and mark on the tape — it reduces paint chipping.
Step 3 — Center-punch every mark
Place the center punch exactly on your mark and strike it firmly with the hammer. You want a visible dimple in the steel. This is the step wood-door guides skip and metal-door guides must not: without the dimple, the pilot bit will skate across the steel and your hole will be off-center.
Step 4 — Drill the face bore (2-1/8″ bi-metal hole saw)
- Chuck the 2-1/8″ bi-metal hole saw with its pilot bit.
- Apply cutting oil to the cut area.
- Start slow. Let the teeth cut — do not lean on the drill. Pressure work-hardens steel and kills hole saws.
- Drill until the pilot bit just pokes through the opposite face, then stop.
- Go around to the other side, seat the pilot bit in the poke-through hole, and finish the cut from that side. This gives you a clean edge on both faces with no blowout.
Speed guidance: ~500-700 RPM for a 2-1/8″ bi-metal saw in thin steel. If you see blue smoke or the teeth squeal, you’re too fast or too dry — more oil, less pressure.
Step 5 — Drill the edge bore (1″ hole saw)
Same technique on the door edge: center-punch, oil, slow speed, drill straight and level. The 1″ bore must meet the face bore cleanly so the latch bolt slides through.

Step 6 — Deburr and treat against rust
This is the step that separates a lasting install from a rusty mess in two years:
- File every cut edge with the flat metal file until no sharp burrs remain (inside the face bore and the edge bore).
- Wipe the bare steel edges clean and dry.
- Spray or brush cold-galvanizing compound / zinc-rich primer onto all exposed steel edges. Two light coats. This is your rust insurance — the factory paint is gone where you cut, and bare steel + moisture = rust.
- Let it dry per the can’s instructions before mounting the lock.
Step 7 — Mount the lock
Follow the lock’s instructions for your backset setting (adjust the latch to 2-3/8″ or 2-3/4″ before inserting it). Slide the latch into the edge bore, feed the exterior assembly through the face bore, connect the interior assembly, and tighten the mounting screws evenly — snug, not gorilla-tight. Over-tightening on a steel door can bind the mechanism.
Test with the door OPEN first: extend and retract the bolt 10 times. Then close the door and test again.
Step 8 — Strike plate and alignment
Mark the strike position on the jamb with the bolt extended (lipstick or marker on the bolt end works). Mortise or surface-mount the strike plate per the lock’s instructions. The bolt should throw fully with the door closed and latched — if it drags, adjust the strike position, not the lock. A dragging bolt also forces the motor to strain and drains batteries fast — see why smart lock batteries drain fast and the nine fixes that work.
Drilling safety (read before you start)
- Eye protection, always. Steel shavings are worse than sawdust.
- Clamp or brace the door. A steel door swinging mid-cut will ruin the hole. Wedge it or have a helper hold it.
- Gloves for handling, but keep them clear of the spinning saw — no loose cuffs.
- Metal shavings are sharp and hot. Brush them away, don’t wipe with bare hands. Keep them out of the lock mechanism — blow out the bores with compressed air before mounting.
- Know when to stop: concrete-filled commercial doors, doors with embedded wiring (rare, but some commercial frames), or any door you don’t own (rental!) — call a locksmith or switch to a retrofit lock.
Renters: read this before drilling
If you rent, do not drill a steel door without written landlord permission. A drilled door is a permanent modification — deposit risk is real. The retrofit locks in the compatibility chart (, August) exist precisely for this: zero holes, fully reversible in 10 minutes at move-out, and the landlord’s key keeps working. Our renter lock guide covers the full shortlist.
Frequently asked questions
Will a smart lock’s wireless signal work through a steel door?
Mostly yes, with one caveat: steel attenuates radio signals. Bluetooth and Wi-Fi reach the lock fine in normal residential installs (the lock’s radios are designed for it), but don’t mount your Wi-Fi bridge or Z-Wave hub in a metal enclosure on the far side of the house and expect miracles. If your lock reports weak signal, move the bridge/hub closer — within 20-30 feet with minimal metal between. Test signal strength in the lock’s app before you finalize placement.
Does drilling void the door’s warranty?
Possibly — many steel door manufacturers exclude modified doors from finish/structural warranties. Check your door’s warranty terms. (This doesn’t apply to pre-bored doors using the factory holes.)
Can I install a smart lock on a metal security/screen door?
Usually no — security screen doors are too thin and their frames too narrow for standard deadbolt bores. They need purpose-built narrow-stile locks, a different product category entirely.
How long does the install take?
Retrofit: ~10 minutes. Pre-bored replacement: ~15-20 minutes. Full drill-from-scratch on steel: 30-60 minutes including layout, both bores, deburring, and rust treatment.
Sources
- engineerfix.com — deadbolt installation on a metal door (backset, center punch, cutting oil)
- Hunker — deadbolt on a steel door (2-1/8″ bi-metal saw, drill-both-sides technique, pre-punched note)
- DEWALT D180004 kit specs (backsets 2-3/8″ & 2-3/4″, thickness 1-3/8″ & 1-3/4″)
Your next step
- Do Smart Locks Work Without Wi-Fi? (2026 Guide) — Next, sort out connectivity: what your lock can do without Wi-Fi.
- 5 No-Drill Smart Locks for Renters (2026): True Retrofits + One Replacement — Compare 5 renter-friendly locks if you are still choosing.
- Do I Need a Hub for Matter Devices? (2026) — Decide whether your lock setup needs a hub.
Recent updates
- 28 September 2026 — Restructured with Key Takeaways, quick list and FAQ; re-verified specs and prices.
Why you can trust AbodeAlly
AbodeAlly is a research-based buying guide, not a test lab. We don’t run a warehouse of gadgets or a lab bench, so we never invent hands-on test results.
Every pick starts with manufacturer specifications and standards documents, cross-checked against reputable expert reviews and long-term owner feedback. We re-verify specs and prices on a regular update cadence, and each article carries a dated changelog so you can see exactly what changed and when.
Spot an error or an out-of-date price? Tell us and we’ll fix it — corrections are published openly, not buried.
AbodeAlly’s editorial team researches smart-home gear full time. We verify specifications against manufacturer and standards sources, cross-check reputable expert reviews and long-term owner feedback, and re-verify every guide on a regular cadence. We don’t run a test lab, so we never invent hands-on test results.



5 Comments